


 VDJ Home
 Downloads
 License VDJ 9
 Support / How-To
 What's New?
Virtual DJ Studio 9
Once you have gotten the main elements of the Player Line, there are a few more advanced options.Below are the Advanced features of a Player Line, followed by a description of each:
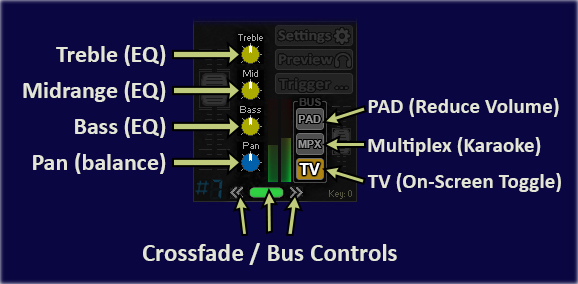
Knobs, Crossfader and Bus Controls
This section covers the Knobs and other buttons not covered on the previous page.Equalizer and Pan Knobs
 Each Player Line has a 3-Band Equalizer, controlled using Knobs. These allow you to
adjust a particular track if you feel it needs a boost in Bass, or the mids need
a little reduction -- whatever you feel the track needs.
The Knob control in Virtual DJ Studio is adjusted by one of two methods:
- Mouse Wheel
- Click and Drag up/down or left/right (or Diagonal)
If you click on the Knob, moving your mouse pointer UP or RIGHT rotates the control Clockwise, and moving DOWN or to the LEFT rotates it Counter-Clockwise.
When the mouse is down your mouse pointer (arrow) will change to show the diagonal NESW (North-East / South-West) pointer.
The adjustments you make are stored in a file named
VDJ_Song_Settings.txt in the folder the song is located in, so that
the settings will be recalled any time you open that file.
 The Pan knob, sometimes called Balance, simply pans the track to the left or right
channel in the mix. The knob works exactly the same way as the EQ knobs - except
the Pan setting is not saved.
Crossfade / Bus Control Buttons


The << and >> buttons assign this Player Line to the Left or Right side of the Crossfader when they are selected, and turn Green in color. These buttons will not appear if the Crossfader is disabled in the Program Options.
If either of these are selected, the Pill button in the center will be Grey.
When the "Pill" button is RED and the word MUTE appears, that line is NOT audible through the main bus.
Clicking the "Pill" button in the center will do one of three things:
1) If the button is currently Green, it will simply MUTE the line and turn the button RED.
2) If the button is currently RED, clicking again will turn it back to Green making the line audible again.
Those two options apply whether or not the Crossfader is enabled.
3) If the Crossfader is in use, and the "Pill" button is Grey (indicating one of the Assignment arrows is selected), clicking the Pill simply assigns that line back to non-crossfader operation, and the Pill button goes back to Green.
To sum up: If you don't use the Crossfader, you can consider the Pill button a simple Mute toggle. If you DO use the Crossfader, see the dedicated Crossfader Page for more in-depth information about its operation.
Main Bus Buttons
 These buttons control how this Player Line is routed to the Main Bus - including both
the Audio and the Video bus -- what you hear on the main Output audio device,
as well as what you see on the Video (or "Karaoke") Screen.
The PAD Button:
This button, when engaged, drops the level of this Player Line significantly (-24db). This can be useful for Talk-Over, or to just keep a line at background music level.Note that when using the AGC feature (described in-depth on the AGC Page), the actual level will rise to a more audible level if nothing else is playing; in this situation, starting another track will Overtake that -24db background music, giving you flexibility to just start a full-volume Track, and effectively kick the Background music out, before actually hitting Pause on that Background track.
For convenience, you can also right-click the PAD button.
The MPX (or Multiplex) Button


When either the L or R are highlighted in Yellow by themselves, this means that ONLY the LEFT or RIGHT audio is being played back.
That channel plays through both the Left and Right of your mix - it simply doubles the selected channel into a Mono output.
This is extremely useful for Karaoke tracks that have an Instrumental-only version in one channel, and a Full Instrumental + Vocals mix in the other channel.
Finally, if the L+R indicator is lit, then BOTH the LEFT and RIGHT channels are down-mixed to MONO.
This becomes useful if a Karaoke track has Instrumental only in one channel, and Vocals ONLY in the other.
Clicking the button cycles through the four options in order, but you can Right-Click and select the Multiplex mode from there.
The TV Button


When it is Normal Grey, it is simply in its default, inactive state.
When it lights up White with an Orange background, that Player line is currently occupying the screen. This can be a Karaoke or Video track, or simply the Album Art for the currently-playing Music track.
Album Art is ONLY displayed if:
- There are no "Upcoming Singers" on the Standby Screen, and
- There are no Video or CDG tracks being played
If more than one CDG Karaoke or Video track is currently playing, you can click the TV button to choose which of them are on the Video Window.
If only Audio tracks are playing, you can select which one's Album Art is currently being displayed in the same manner. Just note that VIDEO-type tracks always override Album Art for audio-only tracks.
Finally, clicking the Audio Mute (the "Pill" button at the bottom) will automatically mute that track's VIDEO as well, turning its TV button RED. Unmuting the audio does NOT automatically put the VIDEO back on the screen.